
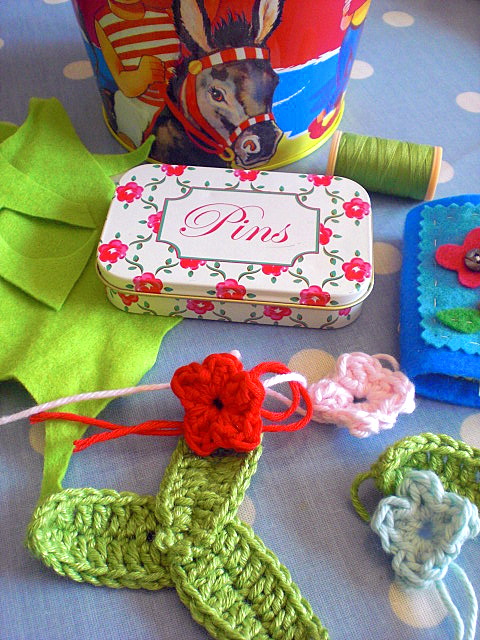
Rather more quickly than I thought I would, I've put together a plan for you to grow your own Springtime Posy Brooch. I started on another one this morning, so I took a picture or two along the way. Hopefully it'll make sense as you go.

You can make them large like mine or smaller if you want. Just change the hook size and yarn to whatever you fancy and off you go. I used a 4mm hook and DK cotton, all in UK crochet words so you'll need to change if you're used to American crochet.
To make the three leaves chain 12. Work 1 dc by missing the first chain and working into the next one along. Into the next chain work 1htr and then work 1 tr into each of following seven chains. Next work 1htr and then 1dc. Now you've worked all the way along the first side of the leaf and need to turn to work along the underside - so make 1ch and then work 1dc into the first space just behind the slip knot.

Continue along the underside of your leaf to make a leafy spine. Work in exactly the same way as before - 1htr, 7 htr, 1htr and 1dc. To end you need to make one chain and then ss into the first dc you made on your leaf and fasten off. Hope that made sense and was easy to follow. Make two more leaves and then you're ready to pick your flowers.

I chose different colours this time as I wanted a splash of red. The flowers are quick and easy to make up, I already have a bowl full as I use them in quite a few projects.
To make your flower, make 1 ch and then work 1dc into this chain. It can be a bit slippy and fiddly so hold on tight. to make the rest of your first petal work *1tr, 1dtr, 1tr, 1dc* all in the same chain you worked your first dc. Continue working in this same chain to make the rest of your petals by repeating the instructions in between the stars. You can make a flower with either four or five petals it's up to you. Once you've finished pull up the slip knot as tightly as you can and then make a ss into the first petal to join. Fasten off and knot the ends at the back leaving a long thread for sewing on to the leaves.

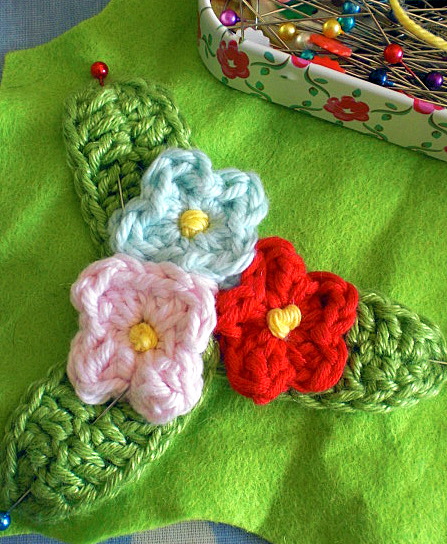
It's all pretty straightforward from now on. Sew your leaves together so they stay in place for you to add your flowers.
Decide where your flowers will go and then stitch them to the leaves. I sew with one end of the yarn first and then sew down with the other, before knotting them together at the back. This way they stay on pretty firmly.

Once all the flowers are on they'll need a splodge for the middle. I use a french knot and wrap the yarn three times round the needle to make a larger knot.

Before you add the felt backing you might want to stitch the flowers together to make sure they lay flat. Then pin your posy to the felt and cut around before stitching all around the leaves.
Once everything is neatly hooked and stitched, it's up to you whether you add a bar fastener to make a brooch, or a hairband or slide to pretty up your hair. Have fun whether you make one or two or three.

Right, I'm off to see if my girls want to come and play with their mummy.


Love it!!! I saw a garland of little crochet flowers, I think on etsy ...it was so pretty.....same flowers ....all different colors. What a fun project!!! Thanks!
ReplyDeleteThank you so much for the pattern, I'm definitely going to make my very own spring posy.
ReplyDeleteCarol xx
Note to self - must learn how to crochet! These look amazing. You make it all sound so simple and look so beautiful. I hate to think what knotty mess I'd end up in.
ReplyDeleteEllie
x
Thanks for that.I shall be experimenting this evening.
ReplyDeleteIt looks really pretty!
ReplyDeleteIsabelle x
thanks so much for sharing
ReplyDeleteaaawww that's very pretty. I have never seen a crochet hook like that one it looks much easier to hold and less slippy. Have a lovely week, dee x
ReplyDeleteThese look amazing, thanks so much for sharing the pattern I will definitely be having a go at these little sweeties!
ReplyDeleteI have been making crochet bracelets recently so these would make a nice change but would keep with the jewellery theme!
Helenxx
How gorgeous is that brooch, love, love, love it.
ReplyDeleteToo sweet.....
Claire :}
Oh..thank you..its very nice...I shall be attempting it very soon.
ReplyDeleteTake care
Jude
Brilliant! Thank you for sharing the pattern - I will be whipping myself up a posy or two - I think it'll be the perfect project to use up odds and ends of yarn.
ReplyDeleteEmily x
I'll play if they won't! Just been catching up and I love the post with Millie and her sheep, gorgeous gift x
ReplyDeleteFantastic Lisa, thank you for this tutorial, that's very nice of you, because this is a beautiful brooch. Love Vanessa xxx
ReplyDeleteOoohhh lovely, Lisa! That's very generous of you to give us a tutorial on how you make them. GORGEOUS! Love Vanessa xxx
ReplyDelete